Thursday, November 5, 2015

Fall Canning Event


Canning can be a great tool for preserving food.  It allows for storage of foods over long periods of time.  This means that even after the season is over these foods can be enjoyed.  There are lots of ways to can foods and many kinds of foods can be canned.  Some methods include pickling, pressure cooking, and boiling.  To learn more about ways to can visit the USDA website.  Canning can also be beneficial because, if done properly, refrigeration is not needed to preserve the foods.  This saves energy and space, and the food will stay preserved longer in a can than in the refrigerator. 
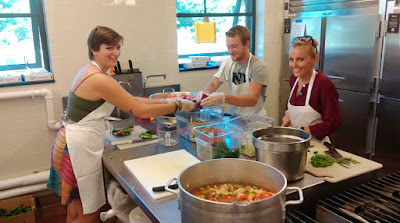
For these reasons, it was a valuable lesson for Farm to YoUNH students to learn.  Not only did we get to experience canning as the incredible process it is, but we also got to learn how to utilize the vegetables we were growing.  It was a lesson in cooking and processing as much as it was a lesson in preserving.  We spent a whole class period learning how to can by cooking both salsa and tomato sauce.  In the process, we covered canning safety, cooking techniques, and canning recipes.

Canning Safety

Canning is popular due to the fact that it saves money and canned products have such a long shelf life. Many people do it at home, but if not done right it can lead to sickness or death. A major disease that happens from improper canning is Botulism (Andress, 2012). Botulism is caused by the Clostridium botulinum bacteria which can cause a rare but deadly food poisoning (Andress, 2012). The symptoms are weakness, trouble speaking, seeing, and sleeping. The final stages can cause paralysis and even death (Andress, 2012). It is extremely heat resistant and shows little to no signs when examining the food that it resides within. To prevent Botulism the only reliable treatment is to apply heat while canning low acid foods (Andress, 2012). A pressure cooker is recommended over boiling or other methods for the best success in removing the bacteria (Andress, 2012). In high acid foods there isn’t as much of an issue with Botulism so conventional boiling and traditional methods can be used (Andress, 2012). If done right canning can be done safely and provide tasty treats all year.

Our Canning Project-The Food

All the produce we used was grown by the Farm to YoUNH program. We found ourselves with an abundance of wonderful tomatoes and decided the best way to utilize them would be to can them. We also used our own peppers and garlic. Crops were all grown at the high tunnels and in the field located at the Fairchild Dairy center. The tomatoes and peppers were grown in the high tunnels to maximize production and utilized trellises to allow for easy access for picking. These crops were grown and cared for by the Farm to YoUNH students and farm manager Ross MacKeil. We used just over 100lbs of tomatoes to make salsa and pasta sauce. During the process of canning we also made tomato juice with some extra tomatoes. This was a wonderful treat for everyone to enjoy while we canned.

Our Canning Project-The Process


            We practiced two different techniques of milling tomatoes for sauce production; by hand and by machine. Sauce tomatoes were first cut into halves and cooked on the stove for a bit to make milling easier for both techniques. The first technique, hand milling, utilized a muddle and strainer. The strainer should be set over a pot to catch the tomato juice. Tomato halves are placed inside the strainer then pressed by hand with a muddle to separate juice from skin. Although this practice may become tiring, it is the traditional technique and works well if you are not making homemade sauce often or at a high volume. On the other hand the second technique, a crank machine, was much easier and faster to use. This machine had a funnel-like bowl on top, a hand crank on the side, and fastened to the side of a table. Tomato halves were placed into the bowl, when the crank is rotated the halves drop down into the machine where they become milled. A pot is placed on the side to catch the contents. This method seemed to be preferred by the class, and is ideal for producing larger quantities of sauce or making sauce often.

During the class canning endeavor, mason jars were boiled on two separate occasions for different purposes. First, both the jars and lids were submerged in boiling water for sanitation. Jars were then pulled from the boiling water using tongs and filled with sauce or salsa, leaving a half-inch of space before the rim. Once filled it is important to wipe the top of the rim free of any water or food, so that the lid will seal properly. Once the lid is secured on the jar it is again set into a pot of boiling water. This second boiling technique ensures that any bacteria introduced while filling the jars is killed, and creates an airtight seal. If done correctly, the lid will make no movement or noise when pressed on.

Recipes

             While we used a recipe specific to our instructors and the produce we had on hand, there are many ways of canning out there.  Recipe books are a good place to start, as well as the USDA website.  Your family may even have recipes for you to learn.  If you are feeling particularly adventurous, open the fridge or walk out into the garden and create something new! Just remember to always follow canning safety rules to prevent illness.  Find your recipe and get canning today!

Source:
Andress, Elizabeth. “Home Canning: Keep Your Family Safe!” Foodsafety.gov. U.S. Department of Health & Human Services, 12 September 2012. Web. 27 October 2015.

Friday, May 29, 2015

From Seed to Salad


         Here at Farm to You NH we produce the salad mix, which mainly gets used at the UNH Dairy Bar in salads such as the Wildcat Harvest Salad (pictured below). The mix includes a variety of lettuces and a greens mix with mustards, baby kale and more. The mix is full with flavor and incredibly fresh!
           To start growing a salad mix we purchase a lettuce mix  and a greens mix from our local seed provider Johnny’s Seeds.  We then use a seeder to evenly spread lettuce mix in half the bed area we are dedicating to the salad mix. About 5 days later we then seed the greens mix in half the bed. Waiting is important because the greens are a bit quicker to germinate and mature to the harvest size than the lettuce mix.   
         By staggering the seeding both mixes are ready to harvest on the same day. We normally seed lettuce on Monday and greens on Friday every 3 weeks for a continual harvest. Three cuttings are harvested out of each bed and then typically buckwheat is seeded as a cover crop.
When harvesting greens mix enough plant should be left to regrow on its own. Ross is pictured instructing Peter on proper harvest height. Once harvested we weigh and then wash the mix in our sink. Following the wash is a spin in the salad spinner. This orange magical tool helps dry off the mix so it will stay fresh and clean. We then box it for shipping one mile to the Dairy Bar where they prepare great meals made with our own salad mix!
         The salads are incredibly flavorful and delicious and we hope you get to try one; they are available year-round as we grow in our heated tunnel all winter so you can get fresh green in February!


Wednesday, April 29, 2015

Recycle Everything.


Composting is an element of recycling that in most kitchens is put on the back burner. 
It's easy to toss scraps into the trash and think composting is too difficult to do in your own home. We think of compost as a huge heap of magical organic material - and it can be, but it can also be a simple way to cut down on each of our food waste. 


If you're interested in taking recycling in your life to the next level there are plenty of ways to do it.
It's good to see how compost works at it's core. 


In our class last week we built a compost pile next to the high tunnels. What's awesome about our relationship with the dinning halls is that we supply food to them and then they give us their compost able food waste. 

It is important to layer the different parts evenly. We used a 5x5x5 pile system. We piled up layers of dry leaves, bedding and cow manure from adjacent Dairy barns, food waste pulp, already composted material, and then repeated. It was great to see that it is possible to use recycled material from the dining halls to grow the food for them. I'm excited to see what else we recycle on campus in the future.        


Monday, April 27, 2015

Career Technical Center Advisory Meeting

        On the evening of April 1st, I found myself cordially greeted by the teacher and chef in charge of the culinary program at the Regional Career Technical Center, housed in the same building as the Dover High School. He invited us to set our things down at our table, labeled "Life Sciences," and then meander back to the kitchen to receive some tasty hors d'oeuvres prepared by students. I filled my plate with bruschetta, pita bread with hummus and swiss chard grown in the school greenhouse, a risotto corn ball topped with what I assumed was pesto, and a spring roll, exchanging mutually hospitable smiles and murmurs with the chefs-in-training standing beside their creations. 
        I took a seat at the Life Sciences table with two Master Gardeners, Anthony and Jacqueline, and the horticulture and aquaculture teacher, Heather Fabbri. For the next half hour, we exchanged introductory conversation and suggested ideas about how to improve Heather's horticultural operation. We listened to Louise Paradis, the director of Dover's Regional Career Technical Center, speak about the Center's programs, students' achievements, and the goals of our meeting.
One of the programs offered at the Career Technical Center is Fire Science.

        Twice a year, the Career Technical Center at Dover High School holds an advisory board meeting with students, faculty, and industry professionals to address the quality of its technical programs and electives. Program facilities and curricula are exposed to fuel a dialogue between teachers, administrators, and professionals. Ultimately, the Career Technical Center would like to ensure that the education they provide mirrors as closely as possible the conditions that students will find in the field when they graduate. This year, Dover High School and the Technical Center are up for renovations funded by the state and town which makes these talks all the more important.
The entrance to the school.

        After Paradis's talk, Heather, Jacqueline, Anthony and I went down to the greenhouse to discuss improvements that could be made to the facilities and curriculum in the future. The horticulture classroom is something like your typical high school science room, with experiment stations all around the perimeter and typical veneered particle board tables for the students to occupy. This is where the resemblance ends, for instead of beakers and bunsen burners on the lab benches, there are fish tanks occupied by colorful ichthyes, and the classroom continues beyond closed doors into a tropical greenhouse, a propagation greenhouse, and even to a garden and (sadly) currently collapsed high tunnel.
Two of the many dozens of fish in the fishtanks in the 
horticulture and aquaculture classroom.
Some fresh spring strawberry growth out in the garden. 

        The possibilities for a facility like this are enormous. Consulting professionals for advice on these facilities is a wise move, and I hope that acting on their advice will be inexpensive enough that it is feasible to heed. With facilities like this, the question of curriculum arises; do we want to teach students how to perform simple agricultural tasks like transplanting seedlings and spreading compost, or do we want to teach more complex biological science and encourage them to conduct experiments investigating better agricultural techniques? Education about agriculture should not be about breaking down processes regularly carried out by cheap labor, such as harvesting, planting, and weeding. It should be about producing critical thinking individuals who are interested in confronting the environmental and nutritional challenges of today's agriculture. This progress that we hope to make in the coming years must cover many avenues; plant and animal research, community organization, utilization of food, and cultivation and irrigation practices, to name a few. We must push not only for improved facilities, but for improved curriculum which addresses the appropriate goal for the good of the planet and all organisms on it.
~Anne Howard


Monday, April 13, 2015

Orange Circle Farm


               Farm to yoUNH takes a field trip to a local farm every semester. This time we visited Orange Circle Farm in Stratham, NH. We were lucky to have the owner Jeff Benton welcome us to his young farm (2013) and show us around. Jeff has a diverse farm consisting of over 150 varieties of annuals, and around 100 Golden Buff laying hens. Although Orange Circle is two years young, there is quite a bit going on for a one-man operation. Jeff’s care for life is apparent although everything he grows (including eggs) is certified organic; he even takes the extra step to not spray anything at all. In Jeff’s words  “The only thing I spray on my fields is rain water”. 

            That’s right rainwater. He created a catchment system on one of the barn roofs to collect rainwater. He stores 1,000 gallons of water per inch of rainfall. This coming summer he plans to install a drip irrigation system that will irrigate his crops from the water catchment. He has a pond on the property from which he could pump water but Jeff values the surrounding wildlife and he feels that putting a pump down there would disrupt the natural state the of the pond. 
           Further solidifying his holistic approach Jeff feels that no food should go wasted! Last year was his first year in production and although some things were a bit more abundant than he expected he packed more into the CSA shares. He knows that a lot of one item can be overwhelming to a shareholder so he sends out weekly newsletters by email with suggestions on how to cook and or preserve that week’s harvest. Jeff is upping his CSA membership this year from 40 to 65 shares and they are being scooped up fast! He is doing this with the help of a part-time employee to help him harvest and pack the boxes. It is a 22-week share with produce and eggs. It is the only way Jeff sells his food so his main focus is the shareholders! No extra produce from the week will go to farmers markets since all the harvest goes to the CSA members!

Thank you, Jeff for having us out!

Consider Orange Circle for your summer CSA share!


Wednesday, April 1, 2015

Time to plan your summer vegetable garden!

Spring is finally upon us here in New Hampshire, so it’s time to think about growing summer vegetables. In class, we started seeds for transplant into our high tunnels a couple of weeks ago. But don’t worry, you still have plenty of time to start seedlings of your own for spring transplant and summer harvest! In this post, I’ll break down the steps to take now for planning a summer vegetable garden from seed.

Image: theguardian.co.uk

Firstly, you’ll need to know how much space you have to deal with. Draw your garden plot to scale (graph paper might help). If you have a large garden (greater than about 4 feet in either dimension), mark out rows 3-4 feet wide with walking paths of about 2 feet between them. Also consider the amount of time you will have to maintain your seedlings and your outdoor garden. Given the space and time you have, decide how many different crops you want to raise, and what they should be. Note that the fewer different crops you choose, the easier they will be to manage.

Look through a seed catalog, or a seed-supply website, to choose varieties for each of your crops. We get our seeds for Farm to YoU NH from Johnny’s Selected Seeds, an employee-owned company in Maine. If you are aware of pest or disease problems on or near your land, be sure to choose varieties that are resistant to those problems, if they are available. If this is the first vegetable garden on your plot, consider how wet the area is. If it doesn’t drain well, your plants will likely be at higher risk for fungal disease, so try to choose disease-resistant varieties.

Image: thedemogarden.org/garden-templates/

Block out your garden diagram with the varieties you’ve chosen, keeping in mind your desired harvest of each crop and the relative sizes of the mature plants. (For example, tomatoes take up a lot more space than carrots.) Proper air circulation and light availability are very important, so be sure not to overcrowd your garden. In NH, sunlight comes from the south, so place shorter plants to the south and taller plants to the north to avoid shading out the short plants.

Once you have a layout planned, you can figure out how many plants of each variety you will need. You can either use the spacing information provided in your seed catalog (or on the seed packet itself), or use an online tool like this one from Johnny’s. Plan to start 10-20% more plants than you will actually need, in case some don’t germinate.

Next, use a calendar to plan planting and transplant dates. In NH, most growers wait until Memorial Day weekend to plant outside, to avoid the possibility of a late frost. Using this date as a guide, mark on your calendar your desired transplant date. Then count backward from that date to find your seed-planting date(s). Refer to the table below for the number of weeks from seed to transplant in the field, or use the Johnny’s calculator, which gives dates for many different crops in one table after you enter the date of last frost.


Image: New England Vegetable Management Guide, 2014-2015 Edition.

Now you’re ready to buy or order your seeds. But don’t forget the media and containers! For seedlings, a finely-textured potting mix is ideal. Many mixes are marketed specifically for seed-starting. There are several different styles of containers for starting seeds, and which type you should choose depends largely on personal preference.

There are two things, however, that all of your seeds will need to be successful: moisture and heat. Make sure your potting media is thoroughly saturated before planting, then follow the directions on each seed packet for seed spacing and depth. Different seeds need different temperatures to germinate, so you might need a heating pad (available at garden centers and seed suppliers), depending on your crop choices and the temperature in your propagation area. Use the chart above to determine optimal temperatures for your seeds. Notice that after germination, most seedlings require lower temperatures for optimal growth, so adjust or remove any supplemental heat once the seedlings have emerged. Don't forget to label your containers; most seedlings look very similar to each other!

To take care of your planted seeds once they are in a warm environment, keep the potting media moist, but not constantly saturated. Too much water can be just as detrimental to the growth of a seedling as too little water, and can lead to problems like root rot. For the first few days of a seedling’s life, it draws on stored nutrients from the seed, so fertilizer is not required. Some seeds, like lettuce, do require light for germination and need to be planted close to the soil surface. Once the cotyledons (the first, “false” pair of leaves) have emerged from the soil, the plants will begin photosynthesis, and should be kept in a well-lit area to grow into strong transplants.